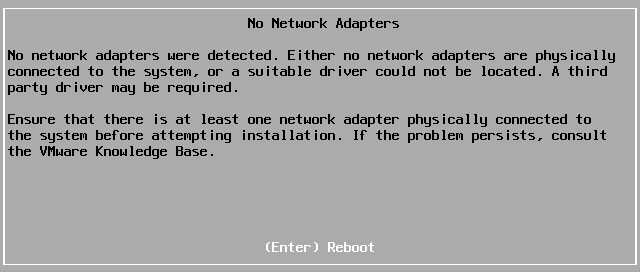
I tried to install the ESXi the other day, and I failed twice before I was able to install that on my PC. The main issue is that the RealTek Network Interface Card is not compatible with the ESXi minimum image.
Change EFI to Legacy Only
This is a small issue, not the main point. But in case you also have this issue during your installation, I write it here.
When you see this warning, you should change ESI to Legacy only in your PC BIOS.

Fix the unsupported Network Interface Card
During the installation, your installation might abort with notification of No Network Adapters if you are using a Realtek NIC(Network Interface Card) instead of an Intel one.

To resolve it, you need to compile your customized image with the NIC driver included. And before that, you have to find your NIC model.
Find NIC model
You need firstly find your NIC information. By using Alt + F1 on keyboard you can enter the ESXi installation command line. And with the following command, you will find the model. In my case, it is a Realtek model.
$ lspcl -v | grep "Class 0200" -B 1

Make your Customized ISO image
You will need VMwareCLI to compile the image on your Windows OS, to install it, firstly open the PowerShell as Administrator. And run the following command and all the way with option Y(yes).
> Install-Module -Name VMware.PowerCLI


Then download the script to assist your compilation from https://www.v-front.de/p/esxi-customizer-ps.html and try to use the -help option to see if it works.

You may not have the right to use it, to resolve that, you can use the following command,
Set-ExecutionPolicy Unrestricted -scope CurrentUser

In case you are curious about the Execution Policy, I list it below. For more detailed info, you can refer to the corresponding MS Doc.

Now, you are safe to run the script, and when prompting, you should choose the [R] option. Using the -help option shows all the available options for this script command.
> .\ESXi-Customizer-PS-v2.6.0.ps1 -help

You can try to find your suitable package from here, download them and put them in a package directory and pass the package folder as a parameter in the command. Click on the driver you need and download the corresponding VIB file you need.

I put my NIC package in the .\pkg folder, the following is an example code.
.\ESXi-Customizer-PS-v2.6.0.ps1 -v67 -izip .\update-from-esxi6.7-6.7_update03.zip -pkgDir .\pkg

After that, you will have your standard customized iso image. You can make an installation flash drive with Rufus.

The Whole Installation Process
I’ve made a tutorial in Chinese on YouTube, you may refer to that tutorial in case you have any trouble in the preceding installation process.
References
- https://blog.csdn.net/shida_csdn/article/details/82863169
- Page allocation error: https://communities.vmware.com/thread/617099
- Make unsupported NIC work: https://www.v-front.de/2014/12/how-to-make-your-unsupported-nic-work.html
- Compile Customized ISO File: http://mvsourcecode.com/vmware-vsphere-esx-6-7-no-network-adapters-were-detected-either-no-network-adaptters-are-physically-connected-to-the-system/
- Modify Execution Policy: https://docs.microsoft.com/en-us/powershell/module/microsoft.powershell.core/about/about_execution_policies?view=powershell-6
- Unrestricted Policy: https://communities.vmware.com/thread/283327
- Packages: https://vibsdepot.v-front.de/wiki/index.php/List_of_currently_available_ESXi_packages
- Enable VT-d: https://software.intel.com/en-us/articles/step-by-step-guide-on-how-to-enable-intel-vt-d-and-perform-direct-device-assignment